Thursday, June 25, 2009

Lunch this Week: Peaches and Mixed Greens Salad

Continuing my efforts to eat fruits and vegetables at as many meals as possible, this week I am enjoying a Peaches and Mixed Greens Salad for lunch. I pair it with a cup of yogurt and some fresh cherries, producing a healthy yet filling midday meal.

This salad, full of peaches, hazelnuts, strawberries, and even a black currant liqueur should even tempt the salad-phobes out there. It hardly tastes like a salad so much as fresh fruit full of rich flavors perfectly blended together. It is also a refreshing treat in the summer since the peaches add a crispness and coolness not always found in lunches. Enjoy this outside on a sunny day or eat it quickly at your desk while you work to spur happy thoughts of being outdoors later.

The base of this recipe can be found at Cooking Light. However, I found several things to change to tailor the recipe to the tastes of my household.

To start, I used strawberries instead of raspberries. I am sure either berry works equally well. The recipe starts with making the dressing, calling for you to simmer the berries, creme de cassis, and sugar. Afterwards, you are to strain out the solids. As a major strawberry fan, I was unable to toss away the luscious berries after simmering them, so I did not strain at all. I simply placed the cooled, simmered mixture into a bowl and continued along with the recipe. Finally, I did not use any creme fraiche. I was hoping for a lighter, fruitier dressing rather than a richer, creamier one.

I combined the rest of the ingredients as instructed (shallots, champagne vinegar, honey, dijon mustard, black pepper, and salt.) I tossed the sauce well with the greens, peaches, green onions, and hazelnuts. I used a mesclun mix full of darker leaves to promote the health-factor of this dish. I served the salad fresh but then also kept it sealed in a container for use at lunches throughout the week.

The salad kept very well, with the peaches retaining their crispness despite the dressing. Just remember to re-toss the salad every day before taking your lunch portion. The peaches, strawberries, and especially the hazelnuts, tend to fall immediately to the bottom!

Tuesday, June 23, 2009

Cornmeal Crusted Tilapia with Tomatillo Salsa with Maple-Glazed Acorn Squash and Roasted Rosemary Potatoes

After the complicated meal blogged about yesterday, I figured we would take a step back and try something slightly simpler. For those of you not familiar with cornmeal, it's pretty fun to cook with. It's a different texture and taste than the more typical breadcrumbs and flour, yet is still simple to use. It's like having curly hair - it looks fancy when in reality it takes but a second to make...!

The mexican, yet summery, undertones of cornmeal and tomatillo salsa mixed well with some basics: potatoes and squash. Yet each was given a slightly different twist than normal with the delicate flavoring added. I found that the three dishes paired well together, and also with a crisp white wine.

Roasted Rosemary Potatoes
To start, get the potatoes ready and cooking. Both the potatoes and the squash will take a good deal longer than the fish to cook so you want to make sure they are in the oven before turning any attention at all to the tilapia. Start with mini red bliss potatoes. Wash them thoroughly, and with the skin still intact, cut them into either halves or quarters so they are in bite-sized amounts.

Place the potatoes in a large bowl and toss with a bit of olive oil (maybe 1 tbsp or so) along with salt, pepper, and rosemary. Put the coated potatoes into a baking dish coated with cooking spray and bake at 425 for 40-45 minutes or until tender. Check them and toss them halfway through.

Maple-Glazed Acorn Squash
Wash the acorn squash and cut into bite-sized pieces. Place in a baking dish and pour 100% pure maple syrup over them so they are just lightly coated without syrup pooling heavily in the bottom. Bake at 375 (or just do 475 if the potatoes are in the oven) for 30-40 minutes. Check them halfway through and toss to make sure they are evenly coated and no edge is burning. Check them around 30 minutes and continue to cook them until they are tender.

Cornmeal Crusted Tilapia with Tomatillo Salsa
Can anyone guess where this recipe came from? I'll give you a hint - you won't be surprised!

Although I originally followed the fish part of this recipe faithfully, I would change it for the next time. I recommend upping the amount of cornmeal and decreasing the flour. Perhaps 3/4 and 1/4 cups respectively. I enjoy the crispness and lightness of cornmeal, but when mixed in equal amounts with flour the covering tasted overwhelmingly of the latter. As for the salsa, I left out the serrano chiles because I am a wimp when it comes to spicy food. If you enjoy the extra hotness add them in, but if not the salsa was quite good without them!

Beware when you are purchasing the tomatillos that you feel for firm ones, the same way you would with a tomato. Ignore the leafy covering and do not worry if it is torn or intact. You will simply peel that off later, regardless. It is only important that the vegetable contained within is ripe.

Make sure not to start the fish until the potatoes and squash have only 10-15 minutes to go as it cooks quite quickly. Prepare the salsa earlier so that when the fish is done you can eat immediately!

Monday, June 22, 2009

Pineapple-Teriyaki Salmon with Caramelized Onion, Green Bean, and Cherry Tomato Tian and Asiago and Balsamic Caramelized Onion Focaccia

Whew, that was a mouthful. The salmon was tasty, light, and delicious, but I truly cannot say enough about the accompanying vegetable and sides. The tian is made with enough flavor (and cheese) that even the staunchest vegetable haters will find a reason to enjoy it. And the bread was worth every minute of waiting and kneeding. I could not get enough of it! And, tested on someone who is not even a huge fan of caramelized onions, it was a massive success.

Keep in mind as you make this meal that the bread is made from scratch and takes a fair amount of time to prepare. Allow enough time so that it can rise twice and still finish in time to be enjoyed for dinner. I started early with the bread and then when well into the second rising turned my attention to the tian. The tian and the bread were put into the oven within a few minutes of each other which is when I was able to, at last, take care of the fish. The salmon cooked relatively quickly, allowing all three dishes to be served warm and at once. Just make sure to check all of the cooking and rising times and to plan in advance!

Asiago and Balsamic Caramelized Onion Focaccia
Mmmmmm! I truly cannot say that enough. I recommend this recipe as forcefully as any other that I have blogged about. Cooking Light has knocked this one out of the park!

Haven't made bread before? It is not hard, but it does take quite a lot of time. I faithfully followed along with this recipe, but needed a good deal of flour in order to knead the dough. It was far stickier than I imagined. Add in small amounts but do not be afraid of spreading it on your counter and coating your hands (and the dough) well enough to avoid any sticking. Otherwise you will not be able to properly knead the dough.

As you can probably tell from the picture above, I also added a bit more cheese than asked for. I used freshly-grated asiago and coated the entire top of the bread. It was a very thin coating, but the cheese left no bare spots once melted. Perhaps not quite as healthy, but definitely delicious. So while I do not suggest going overboard, feel free to indulge just a little more!

Caramelized Onion, Green Bean, and Cherry Tomato Tian
I have had this recipe hanging around for a while with good intention of making the dish, but did not get around to it until now. I am sorry it did not happen sooner.

Once again, Cooking Light continues to wow. And here, too, I was a bit liberal with the cheese. The recipe, as you will see, calls for 1/4 cup of parmesan. I preferred instead to use a blend of low-fat shredded mexican cheese with some parmesan on top. This was a bit more flavorful, helping to convince non-green-bean-lovers to dig into the dish. I kept the cheese topping quite thin to cut down on calories while making the dish look more appealing to the general public.

If you are not a fan of mexican cheese you can simply toss in a bit more parmesan or use a low-fat cheddar or low-fat mozzarella as well. The vegetables came out slightly sweet (from the caramelized onions) and the sweetness worked very well with the savory flavor of the cheese.

This dish continued to reheat well as I took the leftovers in to work for the next several days, enjoying them at lunch.

Pineapple-Teriyaki Salmon
To round out this meal I made Pineapple-Teriyaki Salmon as the main course. This is a very simple preparation that allows many opportunities for experimentation or simply customizing to your own particular tastes.

Create the teriyaki marinade by combining 1/4 cup teriyaki sauce (no salt added), 2 tablespoons brown sugar, 6-oz of pineapple juice, 2 teaspoons canola oil, salt, and pepper. Stir well until the sugar is dissolved and all of the liquids are well blended.

Place a small amount of olive oil in a pan over medium heat. Add the salmon filet. Pour the marinade over the salmon, allowing it to run off the salmon into the bottom of the pan. Place 8-10 slices of pineapple in and around the fish in the pan.

Cook for about ten minutes and then flip. Cook for another 5-10 minutes. Continue to keep an eye on the fish to avoid overcooking. The cooking time will vary greatly with the size of the filet. The salmon should have just lost its bright pink/orange color and be fading to a paler pink when you remove it from the heat.

Serve immediately and enjoy!

Friday, June 19, 2009

Greek Tuna Steaks with Phyllo Potato Knish and Mixed Greens Salad with Pears, Goat Cheese, and Fig Vinaigrette

In a plug for more vegetarian items I need to place the salad front and center today! I'm not sure if it was my Moroccan roots or not, but I could not eat enough of this fig salad. It had a sharp taste which blended perfectly with the creaminess of the goat cheese and the crispness of the mixed greens.

In addition to the salad I made Greek Tuna (hoping that Mediterranean figs went well with Greek spices) and then added Phyllo Knish. While this Jewish addition might seem to stick out as not belonging, the use of phyllo dough instead of a typical bread dough actually rounded out the meal perfectly, bringing a unique Greek twist to the more commonly Jewish food. Many of these dishes also turned out rather pretty, so make this menu when you are working to impress your guests!

Mixed Greens Salad with Pears, Goat Cheese, and Fig Vinaigrette
This delicious creation once again has me sending my gratitude to Cooking Light. I made a bit more dressing than asked for, but also changed the proportions a bit. I used about twice as many figs at first which then left me with a rather thick dressing. I added additional lemon juice, balsamic vinaigrette, and water to fix the consistency and a garlic clove to even the flavors. It left it with a very strong fig essence while still allowing the blend to come through.

Note: I tried using a blender at first but the blades had no luck with the stickiness of figs. Within a minute the figs were coating the edge of the blender and the blades had no impact. I ended up using my food processor which worked quite well, but in the future I would not even bother with the blender.

I tossed the dressing with the salad right away and took the leftovers to work for lunch for the next two days. This salad keeps well for several days!

Phyllo Potato Knish
Oh, knish. One of my favorites. I actually love them with mushrooms and spinach as well (in the phyllo dough) but here we will talk about potato knish. To start, I sliced three pounds of potato into cubes. Boil a large pot of water. Add the potatoes, cover, and reduce to a simmer. Simmer for 20-25 minutes or until very soft. The length of boiling will depend on the size of the cubes. I also left the skin on as I enjoy potato skin, but you can remove it before boiling if you prefer.

As the potatoes are boiling saute 1.5 cups of onion in a pan with a little bit of olive oil and a generous dose of salt and pepper. I used fake salt (no MSG) and green and black pepper. I probably added 1 tbsp of (fake) salt and 1 tbsp of pepper. You can afford to be liberal with salt when it's meaningless!

Place the soft potatoes in a bowl and you should be able to mash them easily. If not, you did not boil them for long enough. Add the onion mixture. Mix well and try a little taste. Add more salt and pepper if needed. (Remember, 3 lbs is a lot of potatoes.)

Using dethawed phyllo dough, place a piece of wax paper on the counter and spray it with Pam. Place the phyllo sheets on top. Place another piece of wax paper (greased side down) on top of the sheets. Place a damp paper towel across the wax paper. The towel should NOT be touching the phyllo dough. You want to keep it from drying out without getting it wet.

Preheat the oven to 400 and have a greased cookie sheet or two ready. Place another piece of greased wax paper in front of you as your work surface. Take three sheets of phyllo dough, making sure the remaining ones stay covered. Spray the top sheet with Pam. Using about 1.5 tbsp of potato mixture at a time, place small circles (like you would cookie dough) far enough part so that you have 8 spots on the phyllo dough in front of you. That should be four across and two down. Cut the phyllo dough between the dollops so you have 8 squares. Fold up the edges and make sure the potato mixture is securely inside the phyllo dough. Use more or less potato mixture as appropriate.

Place the mini knish onto a greased cookie sheet. Bake for 20-25 minutes or until the phyllo dough on the top has browned. They are best served warm.

Greek Tuna Steaks
Surprisingly, the fish comes last today. I found it easier to get the knish in the oven, quickly whip the salad together, and then turn my attention to the tuna. This recipe is quite simple! And, you can feel free to follow along with Cooking Light without asking too many questions. I add a few more sprinkles of spice in the pan to make sure the tuna steaks were well coated, but the idea here is that simple is often best.

I cooked my tuna just through - meaning it was no longer pink in the middle but it had just ceased to be. If you prefer it pinker or more well cooked you will need to continue to check the fish and remove it from the stove accordingly.

Serve up the tuna and knish on a plate with an accompanying salad bowl. Enjoy!

Thursday, June 18, 2009

Lunch this Week: Eggplant Caponata Pasta

Although a little late in the week to be publishing it, for the last few days I have been enjoying eggplant caponata for my daily take-to-work lunch. This dish actually works exceedingly well as a dinner pasta as well, but due to the strident dislike that a certain member of my household holds for eggplant, I must relegate such a favorite to a lunch that I, alone, enjoy!

This pasta is very quickly and easily made and is also enjoyed as a non-vegetarian meal with chicken. Read below to learn about how! But, at the heart of this meal, is the eggplant caponata. I absolutely love it and would eat it as often as possible in all forms if it were, perhaps, more readily available. Look carefully through your supermarket, particularly in areas marked "international" or where there are cans and jars of roasted red peppers, roasted garlic, and olives. My personal favorite is the kind made by Progresso, but sometimes I must search through many stores to locate any caponata at all. You can also order Progresso online at Amazon.com if you run out of other options. The other spot where you might be able to find it is in the fridge section with hummus. Sabra makes a fresh caponata that is quite delicious, but it does not keep for long and is also rather rare.

And what, exactly, is caponata? A delicous blend of diced, sauteed eggplant and Mediterranean spice. Most caponatas also feature olives, but I am careful to pick those out since I am not such a fan. Basically, if you are a fan of eggplant, you will be a fan of caponata.

To start, heat a small amount of olive oil in a pan. Add 3 minced cloves of garlic and 1/4 cup of fresh basil leaves, torn into small pieces. Substitute a couple teaspoons of dried basil if you do not have fresh leaves. Stir until the garlic is beginning to brown and the basil is well sauteed. Add two small cans of caponata. Stir. Add a can of diced tomatoes. Add about 1 tablespoon of lemon juice. Continue to stir. At this point the sauce should be a little bit bubbly.

Add cooked pasta. I prefer bow-ties but any pasta is fine. Mix the pasta in well and serve!

Variation:
Not big on vegetarian pastas like I am? This one works well chicken as well. Cut a chicken breast into small, bite-sized pieces. Marinate the chicken pieces in lemon juice for 30 minutes. Place flour on a plate and drop each chicken piece in the flour, rolling it around to obtain a coating.

Place a small amount of olive oil in a pan. Heat the oil. Add the garlic and basil as described above. Add the chicken. Saute for about 10 minutes or until cooked through. Then, continue as above with caponata.

If you prefer, you can also prepare the chicken in a separate pan than the pasta, allowing those who enjoy it to add when others can leave it vegetarian.

Tuesday, June 16, 2009

Salmon Burgers with Garlic Aioli

Once again, perhaps not my finest picture. It's a good thing this is a cooking blog and I make no claims on photography. Suffice it to say that when placed on a roll with garlic aioli and tomato this poor burger looks much happier.

And lest you think I simply purchased a salmon burger at Whole Foods and am passing it off here as a recipe since I slipped some tomato on, please note that this is made from purchasing a filet of salmon and constructing the burger from scratch. Creating the burger yourself not only allows you to customize the flavoring and spices, but also tastes far fresher than a prepared burger. Obviously, the higher quality your starting filet, the better the burger will be in the end.

So let's get started! I used two lbs of salmon which created 11 burgers. Make sure to adjust the recipe as necessary to ensure that you are creating the correct number. Mine happily fed five people, but you can make as few or as many as you choose. Once you have selected your filets, cut the salmon into small cubes, about 1/2 inch on each side. I found it easiest to cut the salmon first, not breaking the skin, and then to peel each cube off. This was faster than trying to remove all of the skin at once.

Place the salmon in a large bowl and add: 3/4 cup diced onion, 3 tablespoons breadcrumbs, 1 cup fat free mayo (perhaps a little less), 1 tablespoon cajun spice, and 4 teaspoons dijon mustard. I used less mayonnaise to begin, but ended up adding more when the burgers were not sticking well. Feel free to use closer to 3/4 cup at first if you prefer, but make sure you are prepared to add as needed.

Mix the burgers well and shape them into patties using your hands. Just make sure you wash them first (and after!) You do not want to handle any other food products after playing with raw fish. However, there is truly no utensil that is nearly as useful as your hands for this step.

I cooked my burgers on the stove, but if you have use of a grill on a nice day feel free to use that instead. If you choose to grill you might want to place a piece of foil under the burgers to avoid losing half your salmon between the rails.

If you are using the stove, heat a small amount of oil (1 teaspoon-ish) in a pan over medium heat. After the oil is warm, place the burgers into the pan. I could easily fit 4 in a frying pan with plenty of space to flip them. Cook for about 8 minutes on each side. When you flip the burger it should be cooked about halfway through and be beginning to brown. The cooking time will vary based on the thickness of your burgers, so adjust as needed.

While the burgers are cooking you can prepare the garlic aioli topping that goes with them so well. Simply mix together: 1/2 cup of fat free mayo, 2.5 tablespoons lemon juice, 3 minced garlic cloves. Beware, this is a delicious but rather strong aioli so only use a little per burger.

I like my burgers served on toasted buns with the aioli and tomato, but your guests (or you) might also enjoy mustard, onion, or lettuce. Dress your burgers as you choose and enjoy them as they come off the stove, nice and hot!

Monday, June 15, 2009

Shrimp and Broccoli Pizza

Looking for a homemade meal but do not have a ton of time? Want something that everyone can enjoy (or even customize?) Then homemade pizza is the answer! With the option to buy pre-made dough for the crust the work becomes simple. With the option to customize each slice of pizza, the options become limitless. And with the pizza itself, you pick something that everyone is sure to like in one form or another.

I chose to make a shrimp and broccoli pizza and will outline the process below, but remember that the key to cooking is to be creative. Do not be afraid to experiment! Make each quarter different or entire pizzas uniform. Choose vegetables or meats to spice it up. Looking for an unusual pizza? Try smoked salmon, neufchatel cheese, and tomato. Looking for a veggie-heavy pizza? Try roasted eggplant, roast red peppers, caramelized onions, and mozzarella balls. Want something simple? Go with mushrooms or even plain cheese. Just remember that creativity and experimentation are the quintessentials of cooking.

Pizza Dough
I chose to make this pizza with a pre-made dough. There are basically three options when preparing homemade pizza: make the dough from scratch, buy existing dough, or buy an existing crust. There are advantages and disadvantages to all, but I am big fan of the middle option. When you buy the dough it still needs to be rolled out and cooked, meaning it's generally fresher than pre-made crust that is already oooked. The toss-up is that it is obviously a bit more work than the pre-made crust, but still a good deal less work than making dough from scratch. Mainly, you do not have to worry about letting the dough rise, punching it down, etc. This greatly speeds up the prep time. If you choose to follow my choice, pre-made dough is generally available in the refridgeration or freezer sections of supermarkets. Ask if you are not sure!

When rolling out your dough make sure to use plenty of flour. This means on the surface you are rolling it on (I put wax paper on top of my counter to ease clean-up), on the rolling pin, on your hands, and even on the dough itself. Do not go overboard but make sure the stickiness is well in check to allow for rolling and positioning on the pan. You can also sprinkle some flour on top of an oiled pizza pan (or corn meal) to aid in keeping the pizza from sticking. Once the dough is rolled out, place it onto a pizza pan and cook it for 10 minutes at 400. During this time you should make sure all of the toppings are ready to go.

If you are making two pizzas, as I did, and only have one pan, don't worry! Once the first pizza is in the oven (and dressed) then you can roll out the second pizza so it is ready to go. Then, when the first pizza comes out, slide the finished product onto some wax paper or a cooling rack and toss the dough onto the newly empty pan. Repeat as many time as necessary. Remember, you can start eating immediately and do not have to wait for both pizzas to be completed!

Pizza Sauce
I made the sauce "from scratch" as mostly described in my previous post on the shrimp and scallop pasta. If you are truly in a rush you can use a prepared sauce, such as Prego, but keep in mind that its far healthier to make your own. And it really does taste fresher! So if you are with me, let's dive into the sauce.

Start by heating a small amount of olive oil in a pan. Add two or three minced garlic cloves when the oil is warm, stirring to keep the garlic from burning. Add onion and mushroom. I probably put in about 1/2-3/4 cup of each, but use more or less to taste. Saute the onions, mushrooms, and garlic, stirring regularly. Once they have browned then add about 1 cup of diced fresh tomato (as opposed to canned.) My favorite tomatoes are vine tomatoes, believeing them to taste the freshest and sweetest, but feel free to try something else if you prefer. Saute the mixture for another 3-4 minutes afte the tomato has been added.

Now it's time to add some more spice! I use basil, italian seasoning, and oregano. (Keep in mind that we used fresh garlic.) I sprinkle fairly liberally, using about 1.5-2 teaspoons of each. Remember, you can always add more spice later but it's rather more tricky to take it back out.

Once you stir the spices in, add 1 small can of tomato sauce (remember to look for no salt added) and 1 small can of tomato paste. Stir them in well until the paste is blended into the mixture. Add 1 tablespoon of honey. Yes, I said honey! It adds a nice final touch to the sauce, I promise. Stir well. Now use a spoon to taste a tiny bit of the sauce. Add seasoning if it needs more, stir well, and you are done!

Shrimp and Broccoli
Again, this recipe dictates shrimp and broccoli, but feel free to edit at well. I encourage extemporaneous cooking! Use what is in your fridge and have fun with it.

If you are making shrimp and broccoli, however, start by heating a small amount (generally 1 teaspoon) of olive oil in a pan over medium heat. Add two cloves of minced garlic. Stir to avoid burning.

If you are using uncooked shrimp, make sure it is peeled and deveined and add it here. It will take longer to cook than the broccoli. Add that in about 5 minutes. However, if you are using cooked shrimp as I prefer, then add the broccoli now.

Continue to stir every couple minutes to avoid burning. Uncooked shrimp will turn pink when it's done. Broccoli will begin to soften and wilt. If you are using cooked shrimp, wait until the broccoli is nearing completion. It should have shrunk, softened, and wilted a decent bit already. Then, add the cooked shrimp. Continue to stir and cook for another 1-2 minutes and remove from heat. You are finished with your toppings!

Final Steps
Once your crust has cooked for 10 minutes, remove it from the oven. Spread sauce over the crust to within 1 inch of the edge all around. Add broccoli and shrimp across the pizza. Sprinkle with cheese. (I used mozzarella with a bit of parmesan on top.) Place the pizza back in the oven and cook for another 10 minutes at 400. Cool, cut, and serve! The crust should be slightly browning at the edges and the cheese well melted when the pizza is done.

If you are making more pizzas continue to circulate them through this process until done.

Thursday, June 11, 2009

Boycott Georgetown with Me

Abortion is legal. That's right. Legal. No matter how angry that may make some people. Legal. So why are 23% of OBGYN rotations for third year medical students specifically leaving abortion out? Let me say that again. As third year medical students participate in rotations, learning the basics of every specialty, they do not necessarily learn anything about abortion during their OBGYN rotation. 23% do not mention it at all. 45% provide a clinical experience with very little participation. Only 32% specifically offer a lecture on it.

Today, we have a group called Medical Students for Choice. Their mission statement?

Medical Students for Choice® stands up in the face of violent opposition, working to destigmatize abortion provision among medical students and residents, and to persuade medical schools and residency programs to include abortion as a part of the reproductive health services curriculum.

This group does not set out to persuade future doctors to be OBGYNs or to provide abortion. They are existant to destigmatize the aura of performing a legal procedure and to ensure that medical schools are providing education on a standard, legal, and common procedure. Their mission statement asks for simple equality and standard rights under our law. Sad.

As a new DC resident, I was researching PCPs the other day, looking for a new doctor. I was looking at GW and Georgetown among others, assuming that as large, reputable hospitals their PCPs must be good. And then I found out that Georgetown, a Catholic university, does not teach abortion. If a student wants to learn they must go out of their way to schedule an OBGYN rotation at another hospital in the city in order to get that chance. What other medical procedures are so ostracized? How often do you see a medical school telling a student they must go to another hospital if they want to learn how to perform an appendectomy? .2% of people in the US get an appendectomy annually. 2% of women in the US get an abortion annually. A tenfold difference. Which one is more critical to teach?

Let me remind you, abortion is legal. I am not asking you to agree with my political beliefs; I am asking you to recognize that abortion is legal under US law and whether you agree or not, you are bound by it. The Supreme Court spoke 36 years ago. So why are we not teaching a legal procedure to our doctors? It is a part of medicine. Are we so haughty as to believe that we can tell medical schools what to teach or not teach even when it differs from the law? Why follow the law at all, then?

No one claims abortion is an easy choice. No one is pro-abortion. I am sure it is an incredibly hard, painful, emotional decision. So why are we making it any harder? Why are we failing to teach our doctors? What happens when a patient needs their help and they are unable to provide it? Isn't being a doctor about providing care? Not turning a patient away?

Georgetown Medical is sadly not alone. But it is here, by my home, and it stands resolute as a prestigious school. And I will boycott it. I will not go to Georgetown for any medical care. I will not see a doctor who works for Georgetown, even outside of the hospital. I will not be treated by a doctor who studied at Georgetown.

Join me in my boycott. Take a look around and ask exactly what our medical schools are doing. Whether you agree with abortion or not, 22% of all pregnancies end in it. Do you really want to deny these women a legal procedure? Or even if you wish you could, do you really believe that is right?

Having trouble with your tonsils? Sorry, we don't perform tonsillectomies here. I can't because I never learned how to in medical school. Oops! Try going to Kansas.

Wednesday, June 10, 2009

Holocaust Museum

In lieu of a post today, I ask that everyone take a moment to read about this horror:

Holocaust Museum Shooting

Today is about the incredible anti-Semitism that causes an 88 year old man, a man who lived through the Holocaust, to shoot at a memorial commemorating the murder of 11 million. Today is about remembering and learning and realizing why education is so important.

I was at the Holocaust Museum in January. I shudder to picture this.

Tuesday, June 9, 2009

Turbot Meuniere with Summer Squash with Tomato and Basil and Smoked Salmon and Cheese Mini Twice Baked Potatoes

Honestly, this post could write itself. I am not at all ashamed to admit it comes nearly entirely from Cooking Light with me striking out on my own very little. But, nevertheless, when it comes to food (or any other topic) I am sure that I will come up with something to say!

I found these three dishes paired well for a summer meal. The vegetables were fresh and light, depending nearly entirely upon their own fresh taste. The meuniere was surprisingly light, yet different, and very simple to prepare. And the potatoes were, as potatoes and lox always are, quite delicious. I have to admit that I would not have thought of pairing lox and potatoes myself, but why not? Knish and lox are served at brunch together. Bagels are just a starch (albeit the best one) in the end. And, unsurprisingly, the combination here worked entirely. So if you have an extra few minutes, dive into this meal!

Smoked Salmon and Cheese Mini Twice Baked Potatoes
Try saying that three times fast. This dish takes the longest to prepare, so we will start here tonight. The first thing you'll notice is that my picture above does not quite match the one provided at Cooking Light. That's because I am a big believer of lox. And the first thing I did with this recipe was to greatly increase the amount! So if you are making a checklist to go food shopping before reading the rest of this post, make sure to buy a good amount of it.

This recipe calls for small potatoes and instructs you to bake them for 35 minutes. Perhaps mine were a bit on the large side, but I needed to bake them for over an hour in order to reach a soft enough consistency to allow "scoopage." Make sure to check your potatoes with a fork before fully removing them and letting them cool. Otherwise, you risk wasting time when the potatoes should still be cooking!

Once your potatoes are properly soft, you can simply continue to follow along. I followed this recipe with two exceptions: (1) I used a Mexican blend of shredded cheeses rather than white cheddar in an interest of using up open packets of cheese in my refridgerator. The blend included yellow cheddar and monterey jack among others and worked well, so feel free to also branch out with your cheese selection! and (2) I used far more lox. And only Nova. For those of you unfamiliar with "smoked salmon" properly known in my world as lox, there is only one kind that is ever acceptable to purchase and eat... Nova. Nova lox may be slightly pricier, but it is definitely worth it. Typical smoked salmon is heavily salted as part of the process, but Nova is not. Nova is a superior cut without salt. Not only does it taste better, it will make your doctor happier!

Turbot Meuniere
I know, I know. This recipe actually calls for Striped Bass Mueniere. But Whole Foods didn't have Striped Bass when I went so this quickly became Turbot Mueniere. I am sure that either fish would work wonderfully with this simple, classic preparation so feel free to pick your favorite. Any white fish should work! The Turbot provided a "basic" fish, fitting my needs, while also being different than the normal (tilapia, catfish, halibut.) I found it to be a success!

I did follow this recipe (after the fish swap) nearly exactly. I cooked it a little longer on the stove than prescribed since my Turbot was relatively thick and I like my fish cooked through. I also substituted vegetable broth for chicken broth due entirely to my personal taste preference. Like the flavor of chicken? Stick with the original! But if you do not, the vegetable version turned out very well and I would never have guessed that it wasn't originally intended.

Make sure to wait on the fish until the potatoes are well on their way to being done. This entree does not take very long to prepare and you do not want it getting cold as your sides continue to cook. I recommend getting the potatoes in the oven and then preparing everything else: cutting up the squash, tomato, basil, and shallots and making sure to have milk, flour, and spices ready to go. That way when you do begin to prepare the vegetables and fish you can move efficiently.

Summer Squash with Tomatoes and Basil
Finally, finish off your meal with some fresh summer vegetables. This recipe is very simple and straightforward so you can simply follow along! I enjoy my squash very soft and well cooked so I sauteed it for 10-12 minutes before adding the tomatoes. I let those saute for about 3-5 minutes (along with the basil and spices) before pronouncing the meal complete. If you, too, enjoy softer vegetables then make sure to allow the extra time. Following the timing in Cooking Light will result in crispier vegetables.

Serve everything when it's warm and enjoy! (And, a fan of finger food, I just picked up my potatoes and ate them without utensils. Feel free to get a little food-y and do so as well! It makes it all the more fun.)

Monday, June 8, 2009

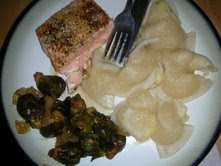
Pepper Crusted Salmon with Soy Drizzle with Perogies and Honey Mustard Brussel Sprouts

The beauty of salmon is that you can do so much with it. A meatier fish, it can be paired with sweet sauces, savory sauces, grilled with just a little seasoning, and served at breakfast, lunch, or dinner. This pepper-crusted version is very simple to make, highlights the taste of the salmon, and definitely hits the spot. The perogies and brussel sprouts complement the dish well, mixing sweet and savory throughout the entire meal.

And yes, I did say brussel sprouts. The oft-reviled vegetable is not at all what you expect, I promise. So try to block those horrid memories of brussel sprouts as a child and give this recipe a whirl. I promise, it's worth it.

Brussel Sprouts
To make this dinner, I recommend starting with the brussel sprouts since they will take the longest to prepare. I prefer the smaller, bite-sized brussel sprouts for this but if you purchase larger ones just cut them in half so that each piece is bite-sized. Once the brussel sprouts are correctly sized put them in a baking pan (I used a glass one but anything works, including broiler pans.) You will bake them at 400 degress for about 1 hr, but need to add appropriately on the schedule below:

20 minutes - add 1/2 of sauce (see below) and stir
30 minutes - add onions and stir
40 minutes - add rest of sauce and stir
60 minutes - done

Make sure to stir the brussel sprouts each time you open the oven to get at them for sauce or onion reasons so that they do not stick or burn to the bottom of the pan.

Now for the sauce! This sounds strange, I know, but once again please have faith and give it a whirl. Somehow, it does indeed work out. The sauce is honey-based; this is very much "make to your tasting" but I believe I used about 1/2 - 3/4 a cup of honey. Add some mustard. In my case I used a bit of honey dijon, but feel free to use any of your favorite types. I put in about 1 tablespoon but use more if you like your food slightly spicier. Now mix in 1 teaspoon of rasberry jam. Stir well and your sauce is good to go! At first, I didn't make enough so after the 20 minute coating I mixed up some more. Depending how much sauce and flavor you want to add feel free to use more or less, or play with the mustard ratio.

As for the onions, simply chop up your favorite variety (:::cough::: VIDALIA :::cough:::) and add bite-sized pieces when called for in the timeline. They, too, will cook in the sauce, especially after the second addition, and come out tender and delicious.

By the time your brussel sprouts are done at the 60 minute mark they should be quite soft, easily forked, and well cooked in the sauce. Delicious! (And think how happy your parents would be that you are eating your green vegetables.)

Pepper-Crusted Salmon with Soy Drizzle
Once the brussel sprouts are well on their route to completion, happily baking in the oven, it is time to turn our attention to the rest of the meal. Let's get going on the Pepper-Crusted Salmon! As you can see from the recipe, this is quite simple. Basically, you are coating the salmon with sesame seeds, green peppercorns, and black peppercorns along with a few other sprinkles. This recipe calls for coating the salmon, then cooking it on the stove, and then baking it. Not one for baking fish, I actually used the stove the entire time. I heated up about a teaspoon of olive oil, put the salmon filet into the pan, and then sprinkled liberally with the sesame seeds, black pepper, and green pepper until the salmon was coated. When I flipped the fish I removed the skin for coating-ease and repeated on that side. The seeds and pepper stuck even as I continued to flip the fish several more times as it cooked. Cooking the salmon on the stove took about 15 minutes total but will vary widely depending on the thickness of the salmon and how well done you prefer your fish.

Don't have green peppercorns? They are available at most upscale supermarkets, but probably not your run-of-the-mill neighborhood store. At Whole Foods I found not just green peppercorns but white and pink as well. I didn't even know that pepper came in so many colors! It was like Christmas in a pepper grinder.

Once the salmon is done you can serve it with a soy drizzle on top. I skipped this step, preferring to taste the richness of the sesame seeds and pepper, and greatly enjoyed my meal without the soy sauce.

Perogies
A staple in my freezer, perogies are so easy to whip up, taste delicious, and are actually very healthy when not served fried and covered in sour cream as so many restaurants do. Although I am sure there are many brands, I believe strongly that Mrs. T's is your best bet. They are sold at most supermarkets and my favorite is the potato and cheddar cheese although feel free to sample others if you prefer. Simply add the perogies to boiling water and cook for 8-10 minutes. Drain and serve while hot. I eat my perogies with apple sauce, but you can use a bit of fat free sour cream or simply enjoy them plain. These are an excellent staple to keep on hand to add to any meal last minute.

Pair this meal with a white or red wine. Although a fish, salmon is meaty enough to be able to sustain either. Let me know what you think of this dinner!

Friday, June 5, 2009

Steamed Trout with Chive-Tarragon Butter with Cous Cous and Artichokes in a White-Wine Garlic Sauce

I really do love cooking.

This time up, it's trout, artichokes, and cous cous. The trout was a new dish but the artichokes are one of my favorites. In fact, in a testament to this dish, I served this to someone who had never eaten an artichoke - or even knew what one looked like. Not a big vegetable fan, he dove in eagerly and declared this a definite success. The garlic and wine flavors provide a delicate, light flavor that pairs perfectly with the rather mild vegetable that is just so much fun to eat. The heart, having soaked in the sauce for a while as each leaf was picked, was especially tender and deliciously flavored. So ready to try this?

Artichokes with Garlic White-Wine Sauce
Like so many others, this artichoke recipe comes not from me but from Cooking Light. You will need to start on the artichokes first since the vegetables themselves will need to boil for 45 minutes and the garlic used in the recipe will need to broil for equally as long. While they are cooking you can prepare all of your other ingredients for this dinner. Make sure not to begin the fish or cous cous too early or they will get cold as the artichokes continue to cook.

I mostly followed this recipe, but left out the parsley as unnecessary. I pour the sauce directly over the artichokes (after placing them in a bowl) so most of the sauce ends up fairly well hidden below and around the bottoms of the artichokes. As I pull each leaf free I dip the "meaty" part into the sauce to provide an extra flavor.

Hint: If you broil an extra head of garlic in exactly the same manner described in the recipe it makes a delicious spread on fresh french bread. Simply scoop out a clove and mash it as you spread it. The long broiling process erases the spicier, sharp taste of garlic and leaves it with a creamy texture and almost sweet after taste. Perfection!

Steamed Trout with Chive Tarragon Butter
This was a new recipe for me and one I will absolutely repeat again. I am a fan of "en papillot" recipes. Watch for others to come out on this blog as well! They produce a particularly moist fish that falls apart at the touch of a fork and melts in your mouth. It is a typically mediterranean style of preparing fish but has now been adopted across many cultures.

Most en papillot recipes call for parchment paper. Unfortunately, I still have not purchased any so I typically use foil instead. I have always found foil to work equally well yet also contain any liquid overflows that may occur. If you, too, like to overload your fish packets then foil might be a reasonable route for you.

Cous Cous
I hate to say it, but cous cous comes out of a box. I promise this is one of the few times you will hear me say that, but there is simply no other good way to make cous cous (at least not easily.) And the boxes actually taste quite good.

I purchased some cous cous from Near East, specifically their toasted pine nut. I recommend the brand and all of their flavors, as well as the original. (If you make the original sprinkle in some brown sugar to give a little extra flavor.) However, I am sure there are many other good brands out there so feel free to experiment! My Moroccan blood gets picky about the best cous cous!

Follow the instructions on the box, but typically you boil water (sometimes with a spice packet or a little bit of butter) and then stir in the dried cous cous once the water is boiling and immediately remove from the heat. If the box tells you to let it sit for 5 minutes with the lid on, follow that rule! If you continually let the heat out by taking the lid off, the cous cous will not absorb the water or become sufficientally light and fluffy. So no peaking!

Serve the cous cous with your fish so that the sauce mixes. Enjoy!

Wednesday, June 3, 2009

Shrimp and Scallop Pasta with Cheesy Garlic Bread

I have to admit that I'm not entirely sure if this picture is helping or hurting my cause right now. Interesting.

But I do promise this tastes better (and looks better in person) than what you see here. So give it a chance! I mean, who can say no to fresh pasta full of shrimp and scallops? And, more seriously, who can say no to fresh cheesy garlic bread?

So go hit up your local market and pick out the best looking shrimp and scallops that you can find, along with some fresh tomatoes, garlic, and bread so that we can start cooking. This makes a great summer meal, full of fresh ingredients, and pairs especially well with a glass of wine and a roof deck.

Shrimp and Scallop Pasta
Although shrimp and scallops are often paired in an alfredo or garlic-wine sauce, I decided to use tomato sauce for this dish. It just fit the atmosphere: delicious without being overly prententious, and something different than the norm.

I also tend to cook with peeled, de-veined, cooked shrimp since I experience major repulsion from doing the peeling yourself. If you buy uncooked shrimp you will need to place them in the pan much earlier on than described below so that they have time to cook. If that is the case, add them when I say to add the scallops rather than later on. But good luck with the peeling and de-veining!

To start, heat about 1 teaspoon of olive oil in a pan over medium low heat. Add 3-4 cloves of diced garlic. Add fresh basil leaves torn up into small pieces. Stir as the garlic heats up and begins to cook. Add chopped onions. I put in about 1/4 cup but feel free to add more or less depending on your like/dislike of onions. I also tend to use vidalia onions (the larger, sweeter ones) in most of my cooking due to personal preference. Add 1/2-3/4 cup of sliced mushrooms. Continue to stir. If you are using large scallops that need longer to cook, add them here. If they are smaller, wait.

Let that mixture cook for roughly 10 minutes or until the onions are wilting and everything is browning. While you are waiting you can boil your pasta. I purchased freshly made garlic parmesan pasta for this dinner, but your standard out-of-the-box pasta from a supermarket will work as well. Just choose your favorite shape and type and get it boiling.

Once your mixture is starting to lightly brown, add an estimated 3/4 cup diced tomato. If you are using small scallops and avoided adding them earlier, add them here. Continue stirring and cooking for another 5-7 minutes. Add the shrimp. Add a small can of tomato sauce, a small can of tomato paste, and a normal-sized can of diced tomatoes. Please note: tomato sauce/etc are renowned for their incredibly high sodium content. You should always check the nutrition label before purchasing. I specifically always buy the cans labeled "no salt added" made by Hunt as well as other brands. Make sure to always compare the labels directly, though. Sometimes the one advertised as healthy is not the best choice!

Sprinkle your sauce liberally with italian seasoning and oregano. Continue stirring and cooking until the sauce is heated through (5-7 minutes.) Once the sauce is hot, add the drained pasta and stir well to coat evenly. Move the pan off the burner and you are now ready to serve!

Cheesy Garlic Bread
Although large pieces of bread are not always the healthiest thing in the world I decided this meal would not be complete without some homeade garlic bread. Purchase fresh italian or french bread. Cut it into slices appropriately, depending on the type of bread purchased.

Pre-heat your oven to 350 degrees. Spread fake butter (I Can't Believe It's Not Butter! How exciting!) on each slice you are making. Crush garlic on top and spread it out as well. I used one clove per slice of italian bread, which I found delicious, but was defintely garlic-heavy so make at your own risk. Sprinkle low-fat mozzrella cheese across the top.

Place your slices on a baking sheet and bake for 5 or so minutes, or until the cheese is melted. This tastes especially good when dipped into your freshly made tomato sauce.

Enjoy!

Tuesday, June 2, 2009

Lunch this Week: Avocado-Brie Sandwiches

As soon as I start talking about my sandwich, lunch cannot come soon enough! The one this week definitely ranks highly in my list of lunchtime favorites. Of course, I toast it, and pretty much any sandwich that involves melted cheese makes me swoon. It's the little things in life.

Once again, my sundried tomato spread made for the first time a couple weeks ago inspired this creation. It was just too good! I feel the need to continue to make and use it in other, innovative ways. So this week I decided to craft an avocado and brie sandwich using the spread.

I use these new, very flat, 100 calorie whole wheat rolls that I found at the supermarket, but any type of bread or roll will work. If you are aiming to be healthy, however, make sure to check the nutrition label. You will quickly be surprised at the vast range of calories, fat, and sodium you will find in bread that may look quite similar on the outside. Think its healty because it's "multigrain" or "wheat"? Better check that label. A lot of the time it isn't. Know what you eat!

Once you identified the perfect roll or slice of bread, it's time to put this sandwich together. If you do not have any sundried tomato spread on hand you will need to prepare it, but luckily we are all experts at that by now.

Spread the spread (hah!) on one slice of bread or one half of your roll. Add sliced avocado. I have been using 1/2 an avocado per sandwich, but I really love avocado. Top with a few slices of brie cheese. Finally, put a couple slices of tomato on top. Done! Easiest lunch ever.

I wrap my lunch in foil and take it to work with a side of fresh cherries and a little apple sauce cup. (Yes, I am still 5 years old.) Lucky for me, we have quite the fancy toaster here at my office and I get to bake my sandwhich for 3 minutes at 400 degrees before eating it. This just lightly toasts the bread while melting the brie. Mmmmmmmmm! Don't have a toaster? No worry! This sandwich tastes great as is.

But of course, you'll need to find another reason to swoon without the melted cheese.

Monday, June 1, 2009

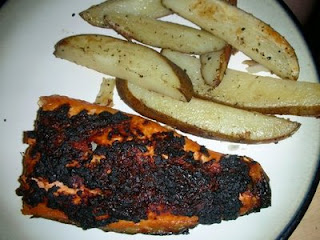
Sundried-Tomato Arctic Char, Gazpacho, and Potato Wedges

I know, I know. What is arctic char, you may ask? The short answer = delicious. It's in the salmon family, but almost appears as a blend between salmon and trout. Native to the arctic (surprise, surprise) it is orange-colored like salmon, but not as thick or as large. The filets will appear almost as if they were an orange colored trout. The taste, too, is similar to salmon but much lighter. Either way, it's tasty and different, helping to avoid the boredom of eating the same thing every night.

This menu is great for the summer, pairing the lighter arctic char with freshly-made gazpacho and some pan-fried potato wedges on the side. I'd start with the gazpacho since you will want to give it plenty of time to sit in the refridgerator to make sure it is properly chilled before serving.

Gazpacho
This gazpacho recipe comes (at least mostly) from Cooking Light. While I prefer the watermelon and other summery versions of gazpacho, this time I was in the mood for the classic. This recipe is also far faster and simpler to make since it uses fewer ingredients than many of the fancier versions do.

Since I was pulling this recipe together last minute I substituted red tomatoes for the yellow ones. While not quite as pretty, it still tasted quite good. I also used chardonnay vinegar rather than a generic white wine vinegar (just because that was what I had on hand - use whichever you prefer.) Not a big fan of yellow pepper? Well, I am, but the other partaker of dinner was not. I made two batches of this soup (cutting the recipe in half) and only used pepper in one of them. They tasted similar, but the cucumber comes across much stronger when there is no yellow pepper. This made two large bowls of each type, plenty for leftovers!

I skipped the garnish as you can see in the picture, but if you are having guests and presentation is important then I would add it on! If you are cooking for yourself, it is less important.

Sundried-Tomato Arctic Char
This dish makes use of the idea of using leftovers again! After making some more lunches I still had some of my sundried tomato spread featured in the very complicated eggplant wraps two weeks ago. I decided to put it to good use as a topping for my arctic char. Didn't read that post? You can find the sundried tomato spread recipe here.

Set your oven to broil. Broil the arctic char (without marinade) for 10 minutes. Check the fish (should still be raw in middle) and brush the top liberally with the sundried tomato spread, to taste. As you can see from the picture above, I spread it thickly across the entire top. Put the fish back in the oven and broil for an additional 8-10 minutes. The middle should be pink, like salmon, when it is cooked through.

If you like a more charred topping, as featured in the picture, you can place the marinade on at the beginning. I prefer the paste less charred and would personally put it on midway through as described.

Potato Wedges
This is my version of a healthier steak fry. You can use regular yellow potatoes, as I did here, or mix a combination of yellow potatoes and sweet potatoes together.

Cut the potatoes you are using into wedges. I used two large Idaho potatoes for two people. Heat a little bit of oil (maybe 2 teaspoons) in a pan over medium to medium-low heat. When the oil is hot place the wedges into the pan. Within about 5 minutes they should be lightly sizzling.

Sprinkle with salt, pepper, and italian seasoning. You can also add a sprinkle of garlic powder to taste, but that should not be the main flavor. Use a spatula to flip and stir the potatoes every 3-4 minutes. You want to make sure they are browning and cooking evenly, with each wedge getting time at the bottom of the pan. Constantly stirring and flipping will also avoid burning the potatoes.

Cook for about 15 minutes. Depending on the size you cut the wedges, cooking time may vary. The potatoes should be tender through the middle but still crispy when they are cooked correctly.

Serve your meal and enjoy!