 This is actually nowhere near as hard as it looks. With a couple pieces of equipment and a few ingredients, you can easily begin making your own sushi as well in no time at all! You'll need to purchase the rolling mat- a bamboo mat used to roll up the sushi into a roll. This is the only necessary piece of equipment but my bamboo mats came with a wooden paddle/spoon as well that was helpful for making the rice.
I've listed what I used in my sushi below - enough to make 10 rolls or about 80 pieces. However, one of the great things about making sushi is that the possibilities are pretty much endless. I stuck to some common ingredients, but don't let creativity stop you. While I wouldn't recommend using raw fish at home unless you for some reason have access to sushi grade fish, everything else is fair game. Stick to the common ones, as I did below, or get creative. Try using other cooked fishes or even meats - there is no reason you can't have chicken, beef, or turkey sushi. Use other vegetables, like eggplant, zucchini, and tomato. Model them after common combinations, such as a mozzarella, tomato, and basil roll. Or, bend the boundaries even further and make dessert sushi. Use a sweet rice and make nutella and banana sushi! There is no limit to what you can do - but make sure to tell us about your attempts in the comments below so that we can all benefit from your creativity.
Difficulty: easy (as soon as you get the rolling technique)
Time: 1 hr 30 min
Cost: $33.46
Sushi
 Ingredients:
1.5 c uncooked sushi rice
1/3 c rice vinegar
3 tbsp sugar
10 sheets seaweed paper for sushi
3/4 c crab sticks
4 oz Nova lox
9 shrimp, cooked, cut into pieces
2 avocado, peeled and sliced
2 mango, peeled and sliced
1/2 c cucumber, julienned
1 tbsp whitefish
1.5 tbsp goat cheese

My list of ingredients is fairly eclectic, as you can tell. But don't be scared off quite yet - different ingredients are used in different rolls. I made a variety of combinations. The avocado, cucumber, mango, crab stick, and shrimp were put together in a variety of combinations, using fewer or more ingredients. The whitefish went with some cucumber and mango. The cheese combined with some veggies and lox; almost a bagel! I only made a single cheese roll and a single whitefish roll, as you may have guessed from the ingredients listed above, but you can certainly change the amounts to satisfy your favorite combos.
I recommend cutting all of your ingredients first and setting them to the side. You won't want to be fiddling with knives and cutting boards at the last minute when also trying to stuff the sushi.
 Next, you'll need to prepare the rice. Cook the rice according to the directions on the package - in my case it meant 1.5 c of water for 1.5 c of rice. This produced about 3 cups total. However, defer to the directions on your rice box.
Once the rice is cooked, lay a piece of wax paper on the counter. Tear a very big sheet as this will be your surface for working with the rice. Spread the rice out, using your wooden paddle or spoon, so it's in a single layer and not too densely packed.
Drizzle the rice vinegar and sugar evenly over the rice. Use the wooden paddle to gently fold, press, and mix the rice until the vinegar and sugar are evenly distributed. Then, smooth the rice into a single layer once again. Let it cool for about 15 minutes or until room temperature.
 Wash and dry your hands. Place the bamboo mat on the counter. Lay a single sheet of rice paper on top of the bamboo mat. Make sure that the lines of the bamboo are parallel to your body.
Lightly wet your hands. Then scoop up a small amount of rice and put it in a pile in the center of the rice paper. Slowly spread it out around the rice paper in a loose, single layer. The rice pieces do not have to be right next to each other to form a tight layer - in fact, if you do that you'll have less room for filling.
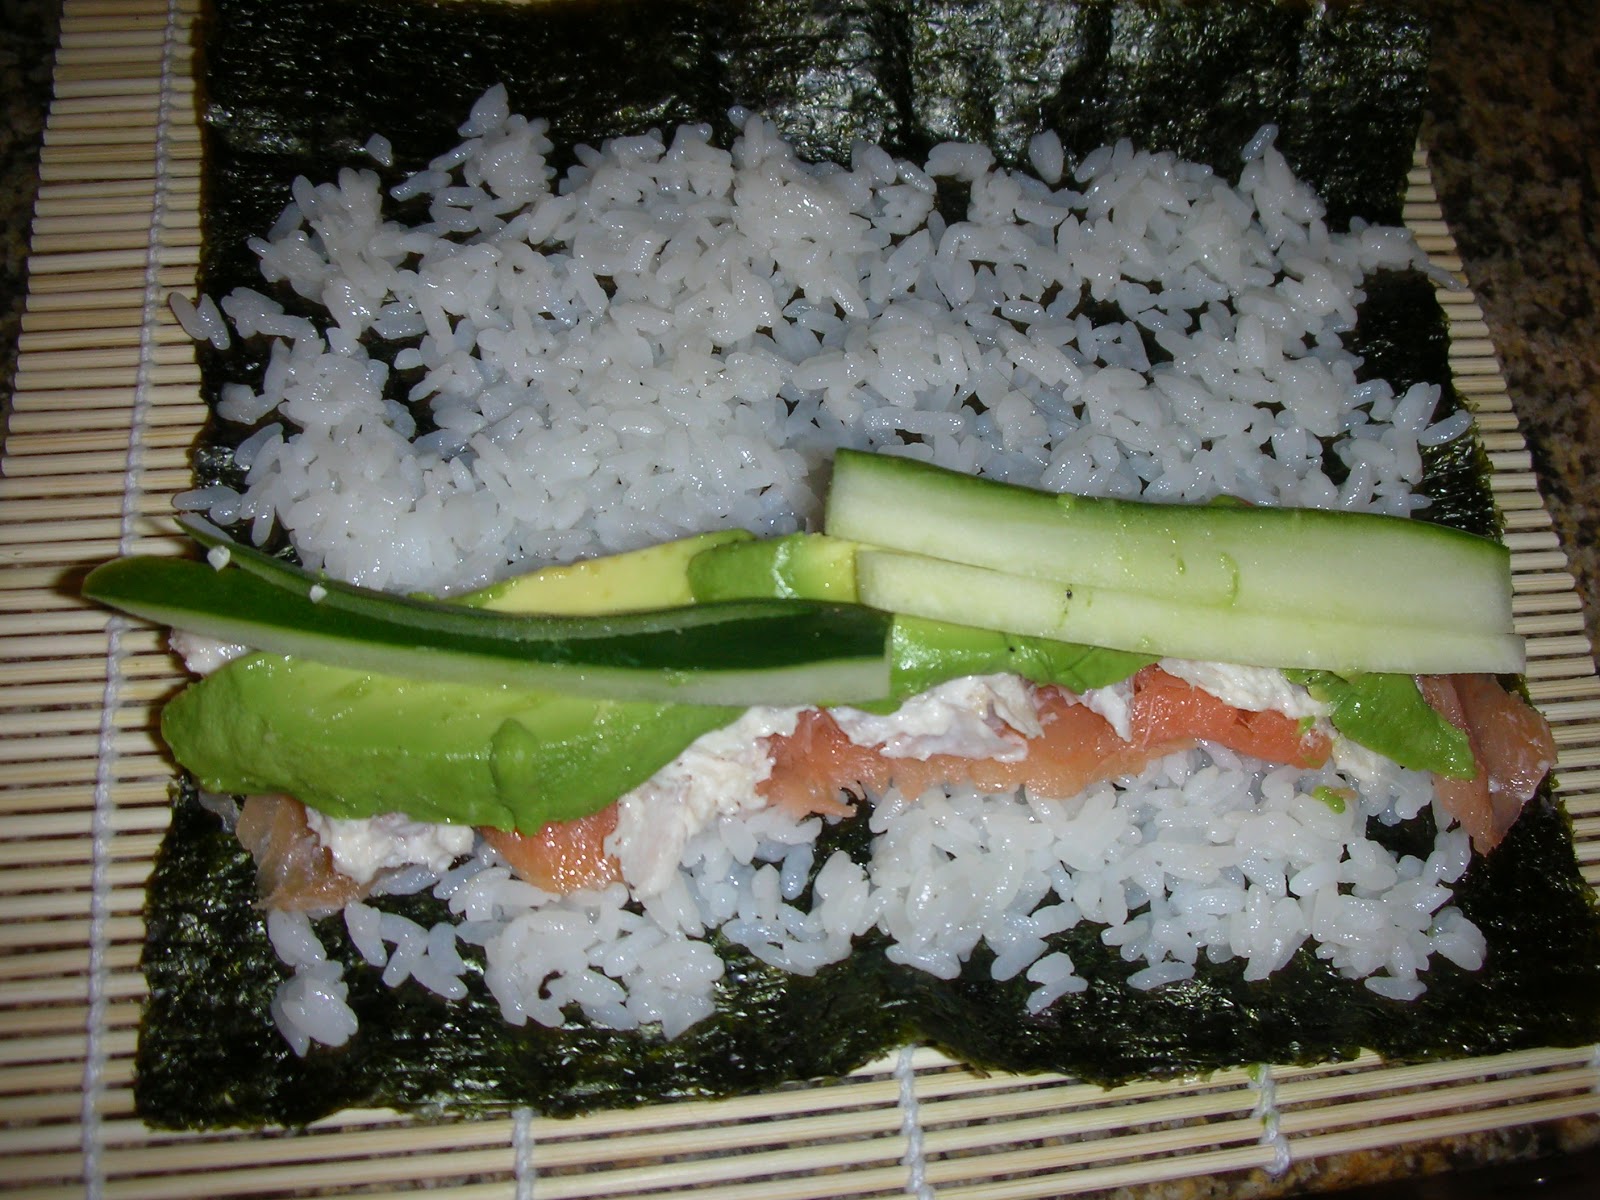
Spread the rice so that it looks like the picture above. Leave a one inch border at one end of the rice paper - the edge farthest away from you. The border that is left should be parallel to the bamboo pieces as well so that it is the last edge when you roll up the paper.
 Select the ingredients for your first sushi roll. Place the pieces in a pile at the end of the rice paper closest to you. This should be the far end to the 1" border, but parallel to it. Be careful to make your roll full, but not overstuffed. For example, in one roll I put a few slices of julienned cucumber, a couple slices of avocado, and a thin layer of lox. Make sure that each piece of the roll extends from one side of the paper to the other since you'll be cutting this into individual pieces.
You can also combine various proteins in a roll - several of my rolls included some combination of crab stick, shrimp, and lox. Feel free to make your rolls higher with proteins or veggies.
 Once your roll is ready to roll, wash and dry your hands again so you will be using clean hands on the bamboo mat. You are now ready to roll! Make sure that the entire time you are rolling, you are only pushing with the mat. If you push with the seaweed you may break it or disfigure the roll.
Roll up one complete circuit of the roll so that the end of the seaweed closest to you circles around and touches the roll again. Hold the ingredients firmly against the seaweed as you roll so they don't just spill out. You want to roll fairly tightly and not leave spaces. Think of sushi rolls that you have eaten before
 Once the first circuit is completed and you have a complete circle, put your palms and fingers around the roll and squeeze lightly to make sure it's nicely round and tight still.
Then, it's time to make the next round. Make sure not to roll the bamboo mat into the sushi. Let the top part, that is now draped over the top of the sushi, stay parallel to the bottom part so it rolls forward as you continue to form the roll.
Continue to roll the sushi until you have reached the end of the seaweed and none is left. Once again, put your palms on the sushi and wrap your fingers around it to make sure it's a firm roll, nicely rounded. Set the roll aside for now.
 Continue with another piece of seaweed and rice, and your next set of ingredients. Follow the same technique and each roll should get a little easier! Keep at it until you have made all 10 rolls and they are neatly stacked on a plate to the side. I found it easier to cut them all at the end since I was in the rhythm of spreading rice, stuffing, and rolling.
When you've created all 10 rolls, take the first one and put it on a cutting board. Use an extremely sharp, serrated knife. I found that non-serrated ones smashed the roll as I cut. Slice the roll into 3/4"-1" wide pieces. Again, just think of sushi you have eaten before. There is no one magic size.
Lay the sushi pieces out on a plate.
 Continue to cut all of your rolls until you have plates full of sushi! Each roll should make about 8 pieces, so if you used the ingredients I listed above, you should have about 100 pieces in all. This will feed 2 people with lots of leftovers, or 3-4 people if you eat all of it in one night.
Feel free to eat the sushi as is, or add some fresh ginger, wasabi, or soy sauce as you prefer. I like to eat them plain!
And, just a note: sushi rolls do not keep wonderfully, but they should last 1-2 days. If you ARE storing them, make sure to seal them tightly in an air-proof container. This can be in tupperware or on a plate with a couple layers of plastic wrap, but make sure its air tight.
Servings: 10
Serving size: 1 roll (note: nutrition varies per roll, but this is an average)
Nutrition: calories 225; carbs 33g; fat 7g; protein 8g; sodium 261mg; iron 2mg
No comments:
Post a Comment